Saturday, April 29, 2017

Secrets of a Library

 Have you ever wondered what is happening a stack or two over from where you are studiously reading a book in the library?  How about all those whispers you hear?  Well, in my library, all secrets are revealed.  
 This month, Leslie, over at Alpha Stamps, asked me to make a piece of art that represented my studio, or other things I collect.  I am an avid reader and my studio is filled with all sorts of books, heck, my entire house is filled with books.  
 All of the decorative papers I used and the Gate fold window card are in this months kit.  Many of the other supplies I used can be found HERE.
I started by carefully cutting the cabinet collage image so that it could be opened multiple ways.  I lined the backside with decorative paper and added some book images.  In every library there is always that student who is actually using there time wisely (that was not me in school).
 But there is more, behind the card catalog (has anyone seen one of these in libraries anymore?) is a secret tryst.  Alas, this does not happen in my studio, my husband tends to avoid the basement, scary girly stuff you know. This flap opens the opposite way of the cabinet, getting the spacing right on this one was a bit tricky but I love the way it turned out.  
And hidden away in the depths of my library is a chaise lounge with a woman from the Paintings of Romance Collage Sheet.  I would love a chaise lounge in my studio.  I do have a sofa, old, covered with a sheet because the cat lives on it.  If I had a chaise lounge my family might never see me.

I hope you have enjoyed this peek into my studio even if it wasn't full of art bits.  
Thanks for stopping by!

Wednesday, March 22, 2017

Parade of Masks

Put on that ball gown, slip on your glass slipper and hail that coach because it's time to head to the masked ball.
Over at Alpha Stamps everyone is getting their masks ready to go.
Complete Supply list HERE.
My artwork suffers from a mild case of multiple personality disorder, so I've made not one mask but three.  
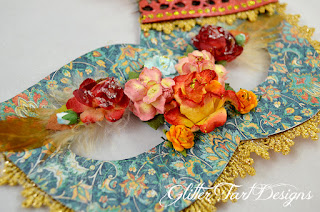
Feathers, oh how I love feathers!  
 What could be better than feathers with flowers and gold lace?  
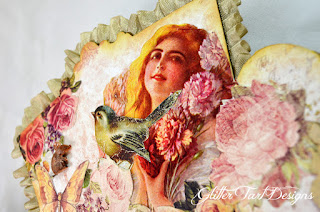
Speaking of Gold, how about an entire mask of gold!?!  
Little secret, this one is my least favorite and it was headed to the trash once I finished wrapping up this project.  We had company over and they brought their 12 year old daughter who fell in love with this.  So it has a good home now and her love for it made me like it a bit more.  
I went to town with the liquid pearls on this one.  I used Mermaid and white opal here, but I must have one of every color.  So scrumptious!  To get a more even colored look I painted the chipboard before applying the liquid pearl in coordinating colors.  You don't want chipboard brown showing through.
Flowers and seam binding.  Y'all know how much I love those goodies.  Strange that I could use all my favorite items and end up not loving the result, oh well.  
I tried to make flower clusters out of the rhinestones.  They kinda turned out.  The two colors I used are aquamarine, for the petals, and peridot for the center.
Mask number three is my oldest daughter's favorite.  She has insisted on a stick (not shown in photos) so she can hold it like a true carnavalian.  
One of my all time favorite supplies from Alpha Stamps has been their mini star sequins.  Mix those with flowers, chipboard flourishes  and silver leafed metal bits and voila!
A note on the feather flourishes, you will need to purchase two sets to get multiples of each design.  Here I have used the same design but have them flipped differently.
The silver bit is a decorative metal piece that I coated in silver gilding flakes.  Just paint on some of the adhesive and then place the silver leaf down working it into all the little nooks and cranes.  It looks amazing in person, wish it looked accurate in photographs.

Now the question is which one should I wear first?!?
Thanks so much for stopping by.  I hope you have a wonderful time at your ball!


Friday, February 3, 2017

Cinderella Coach with a Giveaway!

 Once Upon a Time there was a girl who loved to create...
This month at Alpha Stamps is all about Cinderella!  Y'all know how I love me some fairy tale themed items.  Here Cinderella is whisking off to her ball in a coach shaped chipboard book.
Complete list of supplies at end of post.
Molds are one of my favorite things to create with.  I used 3 different molds on this project.  Here you can see the Wide Header with 4 scrolls silicone mold.   I've found that Ice Resin works best when creating with molds that have lots of tiny twist and turns.  For this particular piece I used some gold pearl ex powder to tint it gold.  Then I covered it with Gilding Flakes.  Doing both gives the piece more depth.  Instead of a single solid tone you get various levels and shades of gold.  However, the gilding flakes are so luscious it was hard to stop gilding.  
 Believe it or not, but I don't always like my first go at things.  I started by trimming the windows in black thin looped dresden boarders. It looked to harsh so I painted over it using Tim Holtz distress paints in scattered straw, picket fence and spun sugar.  It's a little hard to see in the photo, but I added some gilding flakes randomly all over the coach. Check it out, Gus is hanging out in the window!
 You can't have a piece about Cinderella without some birds.  Blue didn't look right so they too got a coating of distress paint.  I used the Royal Icons Mold for the crown and the same Ice Resin and coloring process as I did on the scroll mold.
 The Mouse and pumpkin boarder set reminds everyone that Cinderella's coach was once a humble pumpkin.  
 Inside I mostly collaged papers.  I wanted to keep the page flat so the front cover would sit flush and the first page show through the windows nicely.  The flowers and butterflies are from the Love Clippings Collection paper set.  Hanging out on the wheels are some silhouettes from the Cinderella Silhouettes Chipboard small set.
Cinderella is from the Happily Ever After Collage Sheet.  And you know I couldn't resist topping the page off with some seam binding - bark colored.  
These two completed pages along with two for you to decorate yourself with a few goodies from my stash (some resin bits, sheet music, seam binding and flowers to name a few) are up for grabs.  All you have to do is leave me a comment telling me what Fairy Tale is your favorite.  For additional entries post on Facebook, Twitter and Instagram (One additional entry for each place you post).  Please use the above image with a link to this post.  
Winner will be announced Feb 14th. 
 Leave your e-mail address to ensure notification.  You can private message me on FB if you do not want to leave it in the comment section.  

Ice Resin
Love Clippings Collection paper - Little love clippings, Always and Forever
Distress paint - scattered straw, picket fence, spun sugar
Think looped Dresden boarders 
Tales of you and me Collection paper - Contes de toi et moi
Gilding flakes (where have these been all my life!)
Happily Ever After CS
Alcohol ink - mushroom
Seam binding - bark tan
distress ink - tea dye
Tim Holtz heirloom roses
Lamp post silicone mold
Wide header with 4 scrolls silicone mold
Silicone Mold - Royal Icons
dove mold 
1" pale pink paper roses
small pale pink mulberry blossoms
small white mulberry blossoms
white foam stamen 
yellow mulberry blossoms 
Mulberry Paper Cherry Blossoms
shoe charm
tiny mixed size flat backed pearls
Mouse and Pumpkin Boarders Set
Cinderella Silhouettes Set Small
Coach book chipboard

Wednesday, October 12, 2016

Halloween Bits and Bobs

 Halloween is one of my favorite times of the year and Alpha Stamps knows a thing or two about doing Halloween up right!  This months kits, Halloween Clock Kit,  could go Halloween or Victorian.  So versatile, but of course I went Creepy.
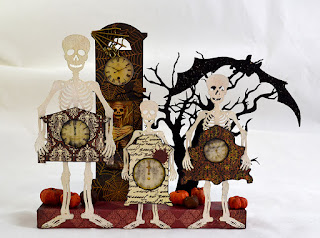
 This is my, Time Stands Still for No Man, piece.  I used a bunch of chipboard bits from the kit along with the Creepy Critters Shape Set, Creepy Tree 5", and the Skeleton Shape Set.  The grandfather clock in the back has an image from the Death Cards Collage Sheet and a spider web charm
 The clock faces are from the Halloween clock faces Collage Sheet and coated with Diamond Glaze.  The bat flying ominously over the skeletons is coated in black glitter.  And pumpkins dot the ground behind the skeletons.
 I couldn't stop playing with skeletons, but switched to a bit of a brighter project using the Tim Holtz Day of the Dead stamps.
 What I love about this set is that each image comes in two sizes.  So for the larger candles I used the larger image and of course for the smaller candles, the smaller image.
I used a tissue paper technique on these.  Each was stamped and then carefully colored using colored pencils before melting them into the candle slightly.  

Well, I am off to create some more Halloween goodies.  I hope you have a wonderful spooky day and thanks for stopping by.  

Friday, September 9, 2016

The Crows Muse

 Halloween is just around the corner...oh how I love Halloween!
Leslie, over at Alpha Stamps, let me play a bit off the reservation this month (I love her almost as much as I love Halloween).  I have been wanting to make a doll similar to the one in the photo below.
I found it on pinterest and it has no link, just a photo, sorry.  Clearly mine is much different, but that is the difference between being inspired and learning by copying.
I started with a floral cone and a deconstructed barbie.  I cut the floral cone to size and then hollowed it out so that the body of the barbie would slip inside.   I decoupaged the cone with old newspaper.  You can't put hot glue directly on the Styrofoam cone, it will melt it. And then I painted it black so you can't see any of the newspaper bits through her rather sheer skirt (Oh the scandal!).
The barbie body is covered with book print (alas nothing by Poe, just some old scifi novel that fell apart on me).  For a head I used a relic and artifacts cast - figurehead.  
From the front it looks like these small feathered crows are single wings.  
From the back you can see that they are two separate crows.  I like to think that they are holding her up as well as helping her fly. 
The spot where her head meets her body is hidden with a black seam binding bow.
 Her bodice is black seam binding.  Black roses in various sizes cascade down her skirt.  Interspersed with lustrous rhinestones.  
 In the folds of her gown she conceals a fabulous chipboard chandelier complete with crows! 
 Her skirt is layers and layer of Tulle.  There is also Tulle wound in and out of the chandelier. To me it almost looks like a spider web or all that stuff they hang from furniture bits in haunted houses.   
And of course it wouldn't be complete without a sparkly spider.   Liquid pearls form the beading work on the chandelier.  
I hope you enjoy my Crows Muse.  She was fun to make
Thanks for stopping by.
I wrote this post while under the influence of decongestants and running noses, sorry if it is a little scattered.  

Monday, August 29, 2016

Ever After 2016 Art Class

 I took a leap this summer and decided to join Tamara Laporte's Ever After Class.  This is my first ever online art class and my first ever faces class.  I have to say that I am thrilled with this class.
The above photo is the class taught by the uber talented Annie Hamman.  We were to follow her instruction video and create what you see above (her's was a bit different, well, a lot different, but I tried).  She is all acrylics.
After each class we are supposed to take what we have learned and make it ours.  This is my interpretation of the fairy tale Snow White.  
I used an image I found on Pinterest as my inspiration.  I tried to follow the image to get to the photographer's info but alas It leads down a rabbit hole.

I still have a lot to learn, but I am quite tickled with myself, after all I have never drawn or painted anything like this before.  

I am having so much fun that I have signed up for Annie Hamman's Soulful Story Art Class.

Saturday, August 6, 2016

Mermaid Cabana Totem

What more do I need to say?  
 Mermaids don't have their cabanas all in a row (Cabana row house set), theirs go up, like sea grass and coral reefs.  
Inside their cabanas they not only change their tops but also put on their legs.  That's right, this cabana is run by Ursula!  
The entire piece is built on top of a piece of wood covered in sand.  Pieces from the Seaside Doors and Windows Set help make these little houses look like they are being used.
 Once the mermaids (Chipboard Mermaid Miniatures) change they can be seen swimming all around.
 The mermaids are painted solid black so that they stand out.  Fish from the Fishtales Collage sheet swim all around the cabanas with them.
 I used a bunch of paints to create the stripes and paint the bits and pieces.  To mute the paint tones I brushed a big of Vintage Photo distress Ink all over the cabanas.
 In addition to the doors and windows bits from the Seaside Decor and beach umbrellas chipboard set help decorate the cabanas.  
  Images from the Bathing Beauties #3 Collage sheet and Beauties by the Sea Collage Sheet peek out from behind the windows.
The roofs are made from Natural Raffia.
Surrounding the entire piece are palm trees.  Yes,  I know there are no palm trees on the bottom of the Ocean but in Ursula's world there are.
To top the entire totem, a lone miniature white beach chair is perched, from here Ursula can watch all that happens in her domain.

Once again Alpha Stamps has out done themselves with this fun kit!
Thanks so much for stopping by, now go hang by the pool because it is one hot day!